Work Tables | How to Maximise Your Work Table
When it comes to DIY having a work table can be extremely useful. When it comes to work tables not a lot of people know where to start. This article will tell you how to maximise your work table.
Design/Things to Consider
When designing your workbench, it is useful to know what the purpose it will be used for. Whether it’s woodwork, engine work, or whatever else you want. You also need to take budget into consideration as everything you want to do may not be possible, or you may have to go for some cheaper alternatives. Follow these design steps to ensure you get everything you want out of your work tables.
- Know what works and what doesn’t (through trial and error)
- What can be improved on? E.g. storage.
- What type of projects will you be doing on your workbench?
- How big/small do you need it?
- Other special features you may want.
Materials/Tools Needed
The materials and tools needed for your workbench will depend very much on what you plan on using it for. Some projects will require different equipment than others and you need to know what this is before you start any project.
Deconstruction & Reconstruction
You can deconstruct and rebuild old workbenches to match your current needs. Deconstruction is fairly straightforward, it’s the rebuilding that can be slightly more challenging. Look at how the different work tables are built and see if you can find a solution before deconstructing it.
Legs and Shelf Support
Ensure that your work table is going to be safe and secure by adding in extra legs and shelf support. Chances are there will be heavy machinery or materials on it at some point or another and the last thing you want is for it to collapse under the weight.
Bracing the Top
Bracing the underside of the work table will also help make it stronger and more durable over time.
Laying Down the Bench Top
After the basic structure of the work table is complete its time to but the workbench on top. This can be a pivotal moment as you may be able to see any weaknesses or unevenness.
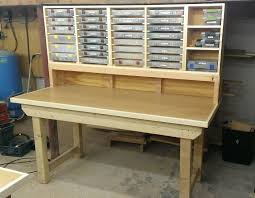
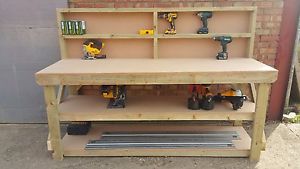
Adding “Extras”
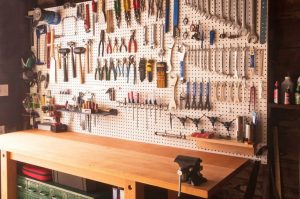
Once the main part of the work table is built and secure you can start adding extras. This could be anything from shelving to extra storage, it could be a pegboard or a coat of polyurethane on the worktop to stop it from wearing as easily.
Organise Your Work Space
Next is time to organise your work table. Ensuring that everything has a place and can be put away. There is nothing worse than a messy workbench. If you’ve added extra storage or shelving, then you will hopefully have plenty of places to put your tools and materials. You should also clear out your toolbox and throw out anything that you don’t need. Organisation can make you more efficient when working as you will know where everything this and be able to get to it faster.

A seasoned columnist who explores the intersection of media, memory, and everyday culture. Isla is known for essays that blend current events with personal narratives and literary reflections.